How to Take Apart Little Tikes Picnic Table: A Step-by-Step Guide
Introduction
Do you have a Little Tikes picnic table that needs disassembling? Whether you want to store it away during the winter or simply need to transport it to a different location, knowing how to take it apart is essential. In this comprehensive guide, I will walk you through the process step by step, ensuring a hassle-free disassembly experience.
A Brief Overview of the Little Tikes Picnic Table
The Little Tikes picnic table is a beloved piece of outdoor furniture for children. It provides a safe and fun space for little ones to enjoy meals, play games, or engage in creative activities. However, there comes a time when you may need to disassemble it, either for storage purposes or when moving to a new house.
Importance of Knowing How to Take It Apart
Taking apart the Little Tikes picnic table properly is crucial to ensure its longevity and ease of reassembly. Failing to disassemble it correctly can result in damaged parts or difficulties during reassembly. By following this guide, you’ll gain the necessary knowledge to dismantle the picnic table efficiently without any unnecessary stress or frustration.
So, let’s dive into the step-by-step process of disassembling your Little Tikes picnic table and make the task feel like a breeze.
Tools and Equipment Needed
List of Required Tools and Equipment
Before you begin the disassembly process, it’s crucial to gather the necessary tools and equipment. Here’s a comprehensive list of what you’ll need:
1. Screwdriver: A Phillips head screwdriver is typically required to remove screws holding the picnic table together.
2. Wrench: Depending on the model, you may need an adjustable wrench or a specific size wrench to loosen and remove bolts.
3. Rubber Mallet: A rubber mallet will come in handy to gently tap and loosen any stubborn or stuck parts.
4. Pliers: Pliers can be useful for gripping and twisting small nuts or bolts that may be difficult to remove by hand.
5. Lubricant: If you encounter rusted or corroded parts, having a lubricant like WD-40 can help loosen them for easier removal.
Importance of Having the Right Tools
Having the right tools for the job is essential for a smooth and successful disassembly process. Using the correct tools ensures that you can effectively remove screws, bolts, and other fasteners without damaging the picnic table’s components. It also saves you time and frustration that may arise from using inadequate tools.
Moreover, using the appropriate tools decreases the likelihood of accidents or injuries. For instance, using a screwdriver that fits properly in the screws reduces the risk of slipping and hurting yourself. Additionally, pliers provide a secure grip, preventing hand injuries while removing small nuts or bolts.
By investing a little time in gathering the necessary tools and equipment, you’ll ensure a seamless disassembly experience, allowing you to take apart your Little Tikes picnic table with confidence and ease. So, let’s move on to the step-by-step guide and begin the disassembly process!
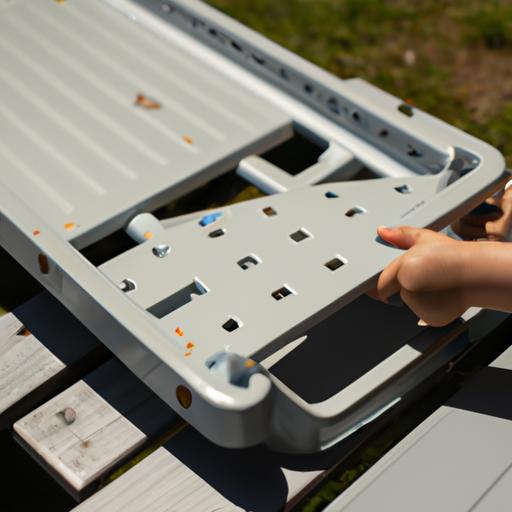
Step-by-Step Guide to Disassembling the Little Tikes Picnic Table
Taking apart your Little Tikes picnic table may seem like a daunting task, but fear not! With this step-by-step guide, you’ll be able to disassemble it with ease. Just follow these simple instructions:
Step 1: Removing the tabletop
Start by locating the screws or bolts that secure the tabletop to the frame. Using a screwdriver or wrench, carefully remove them. Make sure to keep the screws or bolts in a safe place to avoid misplacing them. Once all the fasteners are removed, gently lift the tabletop off the frame and set it aside.
Step 2: Detaching the seats
Next, focus on detaching the seats from the picnic table. Look for any screws or bolts that connect the seats to the frame. Carefully remove these fasteners, setting them aside for later use. Once detached, lift the seats off the frame and place them aside.
Step 3: Separating the legs
Now, let’s move on to separating the legs from the frame. Check for screws or bolts that secure the legs to the tabletop and seats. Carefully unscrew or unbolt them, ensuring that you don’t damage the parts in the process. Once the fasteners are removed, gently separate the legs from the frame.
Step 4: Proper handling of small parts
During the disassembly process, you may come across small parts such as screws, bolts, or washers. It’s crucial to handle them with care to prevent loss or damage. Consider using a small container or bag to keep these parts organized and easily accessible for reassembly.
By following these step-by-step instructions, you’ll be able to disassemble your Little Tikes picnic table without any hassle. Remember to keep track of the small parts and store them safely until you’re ready to reassemble the table.
Conclusion
In conclusion, disassembling your Little Tikes picnic table doesn’t have to be a daunting task. With the right tools, proper technique, and a little bit of patience, you can easily take apart your picnic table for storage or transportation purposes. By following the step-by-step guide provided in this article, you’ll be able to dismantle the table efficiently and ensure its longevity.
Remember the importance of troubleshooting tips when dealing with stubborn screws or bolts. Don’t let rust or corrosion discourage you; there are solutions available to overcome these issues. By addressing these common challenges, you’ll be better equipped to handle any obstacles that may arise during the disassembly process.
Safety should always be a top priority. Remember to use gloves and protective eyewear to prevent any potential injuries. Additionally, ensure you have a clean and well-lit workspace to work comfortably and reduce the risk of accidents.
By adhering to these guidelines, you can safely and successfully disassemble your Little Tikes picnic table. Once it’s dismantled, store the parts carefully and keep track of all the small pieces. When the time comes to reassemble, refer back to this guide to simplify the process.
So, go ahead and confidently take apart your Little Tikes picnic table. Enjoy the convenience and flexibility that comes with knowing how to disassemble and reassemble it whenever needed. Happy disassembling!